After running a Windows server for a period of time, the system C drive frequently runs out of space. When this capacity shortage occurs, many administrators ask whether it is possible to change allocation parameters without losing programs or starting over from scratch. The answer is yes. Utilizing safe disk partition tools allows you to allocate available free space from other storage volumes onto your primary drive. This article introduces how to change partition size in Windows Server 2019/2022 using native tools and safe partition software without losing data.
Change Partition Size with Windows Server 2019/2022 Disk Management
Like alternative product variants, Windows Server 2019/2022 includes an integrated Disk Management tool to assist system administrators in modifying partition layouts. The Shrink Volume function can decrease NTFS volume thresholds to free up space. Meanwhile, Extend Volume increases the size of an NTFS storage allocation, but only when contiguous unallocated space resides directly to its right boundary. Consequently, native tools cannot extend a partition by simply contracting an alternate independent volume. Review the detailed tutorial to learn how to shrink partition allocations natively, including workarounds if the system encounters layout blockers.
Before expanding any drive capacity block using native tools, unallocated space must exist on the exact same physical drive map. To generate this free container space, you must choose to either shrink or wipe another partition volume. While Shrink Volume safely processes filesystem contractions without data loss in most cases, the resulting unallocated space is non-adjacent to other partitions. Because built-in tools only support adding capacity to an immediately adjacent partition on its left side, the Extend Volume greyed out error exception triggers for both drive C and drive E immediately after shrinking drive D.
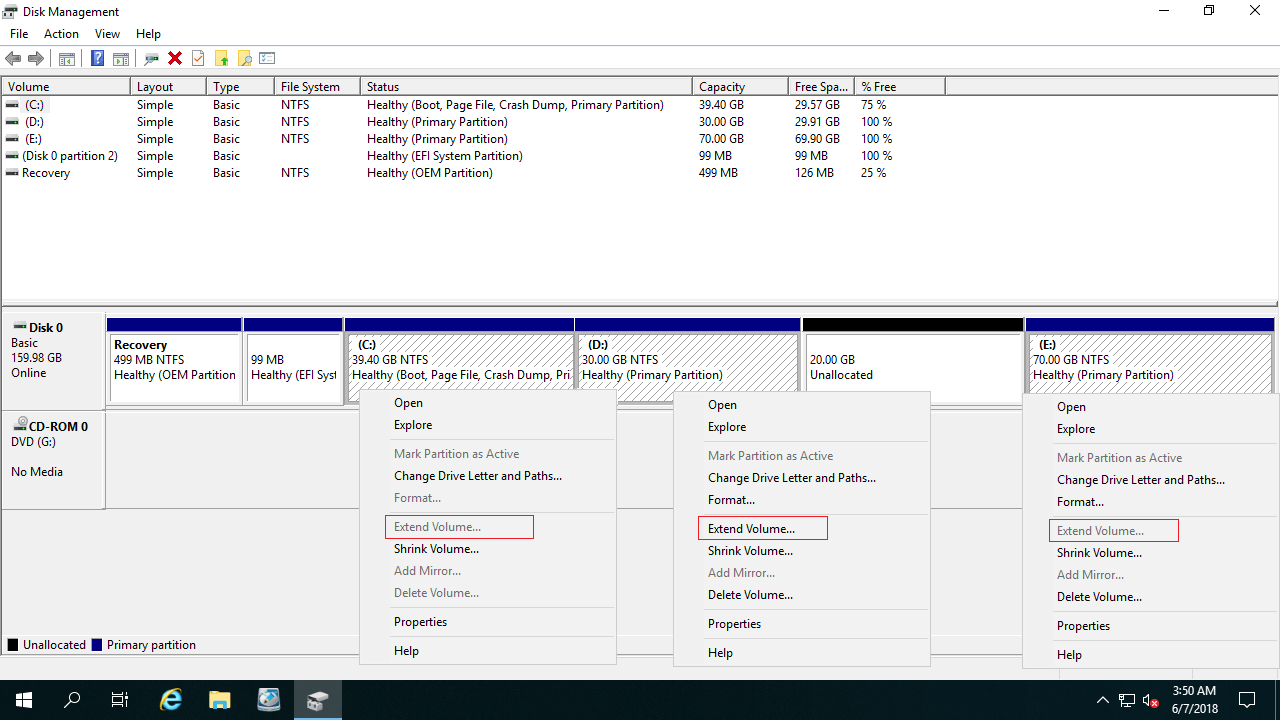
The only way to increase partition size using native tools is by completely removing the contiguous partition on the right. In addition, the partitions to be extended and deleted must be the same primary or logical drive. If your disk partition layout doesn't meet these requirements, you have to run third-party software.
While multiple disk partition software options support Windows Server environments, securing a verified system backup before modifying sectors remains an essential best practice. Altering partition sizes carries inherent data loss or volume structure corruption risks during live adjustments. To complete modifications safely, all disk, partition, and file allocation parameters must be updated accurately, and files may be shifted to new layout positions. Consequently, an unexpected software error or sudden hardware interruption can damage file tracking systems.
Outperforming standard system applications, NIUBI Partition Editor incorporates advanced protection frameworks to secure enterprise data integrity:
- Virtual Mode - Stages all planned operations as pending tasks for visual verification before modifications are written to physical disk sectors.
- Cancel-at-will - Allows you to safely abort active process execution at any progression step without creating sector layout errors.
- 1 Second Rollback - Instantly snaps the server back to its original state if any system blocker or error is encountered during partition resizing.
- Hot Clone - Duplicates active drive mappings inside live operating environments without downtime, establishing immediately bootable secondary arrays for rapid disaster recovery.
Increase Partition Size with Safe Partition Software
Contracting or expanding storage thresholds is extremely simple when deploying NIUBI Partition Editor, requiring only a basic drag-and-drop workflow across the visual disk allocation map.
Steps to decrease partition size in Windows Server 2019/2022:
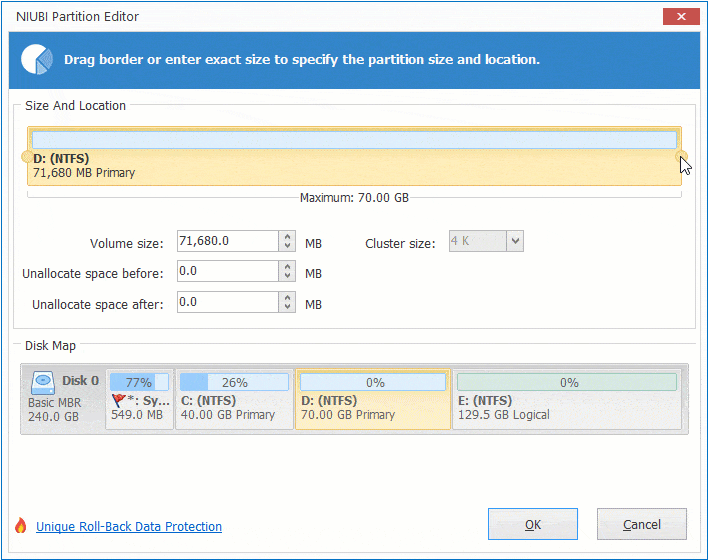
Launch the utility, right-click the target NTFS or FAT32 storage volume (such as drive D:), and select the Resize/Move Volume feature.
Option 1: Drag the left border rightward or enter an amount in the box of "Unallocated space before" to generate unallocated space on its left side.
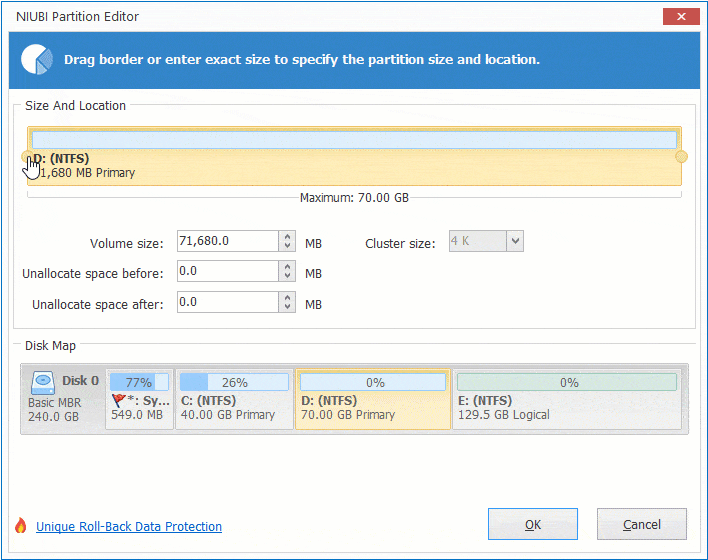
Option 2: Drag the right border leftward or enter an amount in the box of "Unallocated space after" to generate unallocated space on its right side.
Steps to increase partition size in Windows Server 2019/2022 safely:
- Follow Option 1 to shrink drive D: and create unallocated space on the left side.
- Right-click the system drive C:, select Resize/Move Volume again, and extend the right border rightward to merge this unallocated space.
- Click the Apply icon located in the upper-left corner of the primary panel to confirm and authorize execution.
If your primary goal is to expand drive E:, create the unallocated space on the right side when shrinking drive D. Then right-click drive E: and drag its left border leftward to merge the unallocated space.
- If you intend to contract drive E to expand the primary system drive, an intermediate step is required to move unallocated space to the left before adding to C drive.
- Follow the technical guidelines demonstrated in the video tutorial if you need to increase D drive space parameters inside Server 2019/2022 layouts.
- If your physical hard drive lacks sufficient available free space, follow the instructions to copy disk to a larger one and extend partitions with extra disk space.
- The utility operates within Virtual Mode during configuration stages; real storage boundaries remain secure until you choose Apply.
- When processing configurations running hardware storage configurations like RAID 1, 5, or 10 arrays, do not break operational arrays or adjust controller parameters; execute the identical sizing steps directly.
Adjust Partition Size inside VMware/Hyper-V Virtual Machines
To change partition size inside VMware or Hyper-V virtual machines running Windows Server 2019/2022, there is no difference when available free space exists anywhere on the same virtual disk layout map.
When the entire virtual disk is full, you can expand it directly without physical cloning. Follow the steps to increase virtual disk size in VMware or Hyper-V instances. After expanding the disk, the additional space is shown as unallocated at the end of the disk. Finally, follow the steps above to add unallocated space to C drive successfully.
Beyond changing partition size configurations across Windows Server 2019, 2022, and 2025 platforms, NIUBI Partition Editor handles a comprehensive array of low-level drive management, filesystem conversion, optimization, and bad sector scanning workflows.